Colour INKspiration – CI157

colink-blogbanner-v3

What a bright and cheerful colour palette we have this challenge at Colour INKspiration #CI157. This being our last challenge for the year too! Let’s take a look…

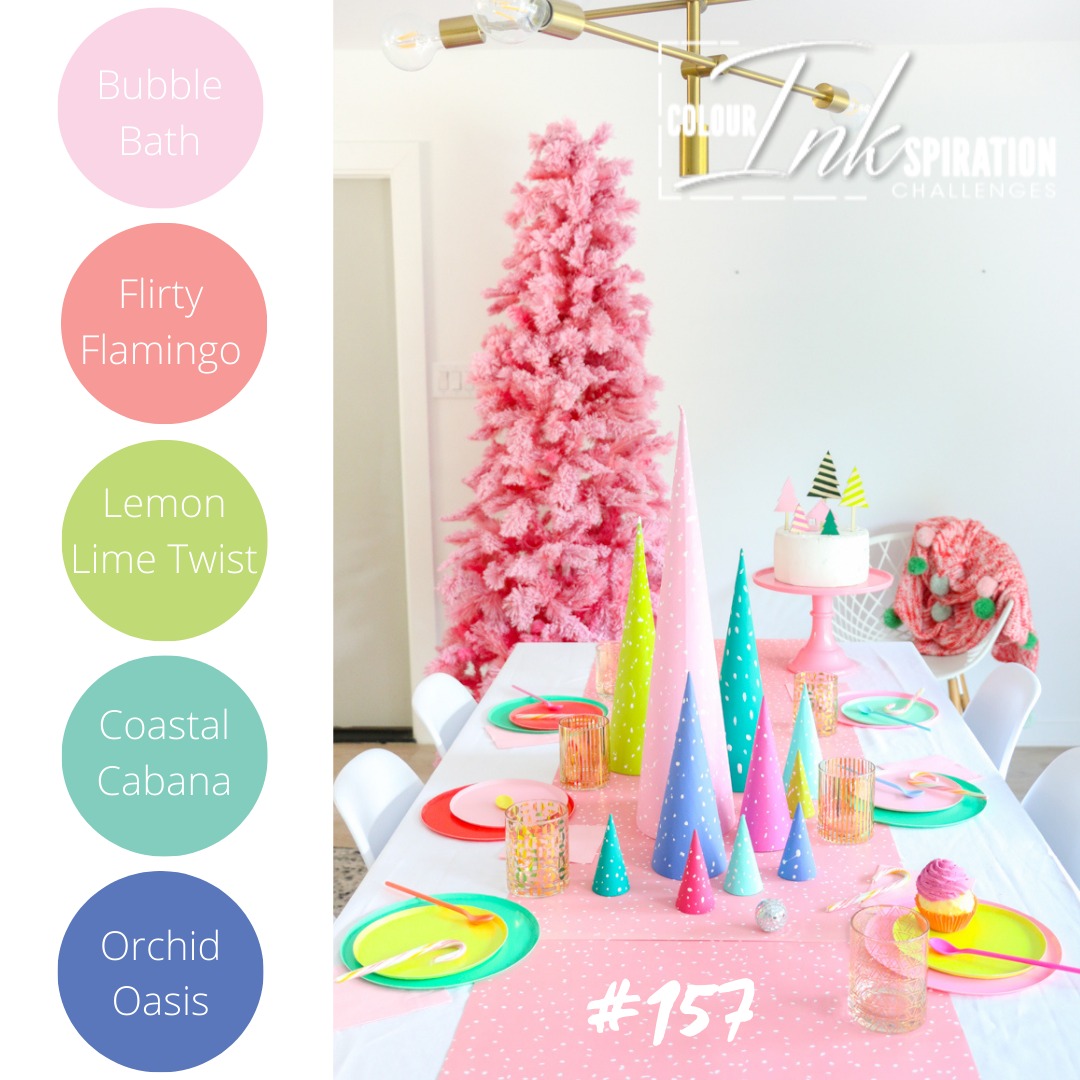
We have Bubble Bath, Flirty Flamingo, Lemon Lime Twist, Coastal Cabana and Orchid Oasis. Plus of course we can use Black, White, Crumb Cake and metallics.

Whilst the inspo image is Christmas themed, these colours reminded me of summertime ahead. A fun part of summer days is ice-cream…. I mean, come on who doesn’t love an ice cream?! So I pulled out a very brand new bundle coming next January. It’s the Ice Cream Swirl bundle and the feature is the very large size ice cream scoop – OMG I so want one to eat just looking at it.

Rose Packer, Stampin' Up!, Ice Cream Swirl bundle

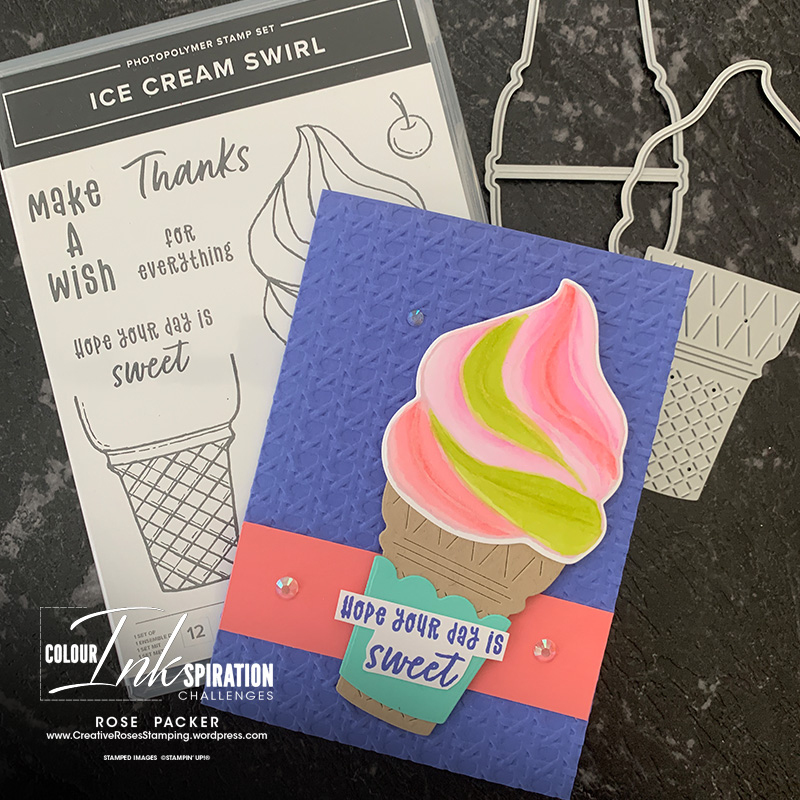
To make this card I cut a card base from Orchid Oasis cardtock and embossed the front with the Cane Weave embossing folder. Next I layered a strip of Flirty Flamingo cardstock – I cut to the width of the cardbase so for me that 105mm, the height really can vary to your liking – mine is 30mm.

I die cut and embossed the cone at the same time from Crumb Cake cardstock. The die set features these two dies that work together, which is such a time saver. I cut the paper holder from Coastal Cabana cardstock, and adhere it over the top. I stamped the sentiment in Orchid Oasis ink and fussy cut it out. I set these aside while making my ice cream.

Rose Packer, Stampin' Up!, Ice Cream Swirl bundle

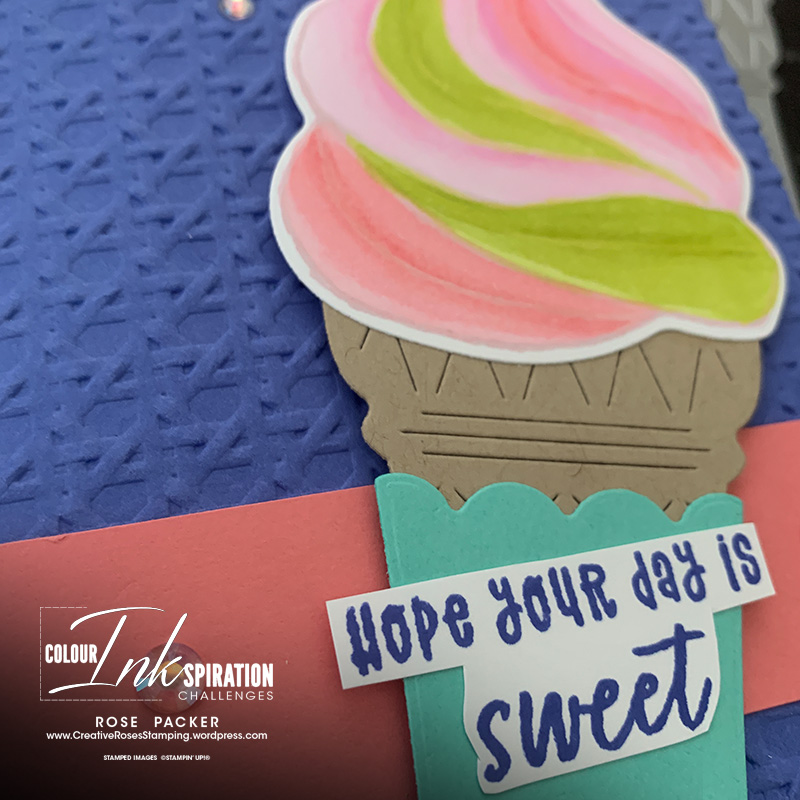
I stamped the swirl in Bubble Bath ink, then coloured my flavours using Stampin’ Blends in Bubble Bath, Flirty Flamingo and Lemon Lime Twist. After colouring, I die cut it out, adhered it to the cone and used dimensionals to adhere in place on my cardfront. I finished off the card with a few Iridescent Rhinestones.

Don’t you just want to eat one now?! I can’t wait to place some more with this bundle in the coming months.

ColINK-badge-v3

More INKspiration is loaded up over in our Facebook Challenge group. Head over and enjoyed all the amazing inspiration from the crew. We will be excited to have you play along with us. This challenge runs for 4 weeks over Christmas. It closes at 7pm on Monday, January 8th. Look forward to seeing you over on the group..

Until next time… Stamp Creatively,
RosePacker-SignOff

Click to shop supplies specific to this project:

Stampin’ Staples – Click to shop these commonly used crafting supplies:

Stampin' Seal
$14.00
Paper Trimmer
$46.00
Bone Folder
$12.25
Paper Snips
$19.25
Clear Block B
$12.25
Clear Block D
$16.75
Clear Block E
$23.00
Clear Block H
$16.75

You Can Create It – August pack ideas

It’s been a while between blog posts, but I am back with a simple project idea using the August pack from the You Can Create it kit. This monthly pack features product and colours from Stampin’ Up!’s Masterfully Made suite.

Let’s take a look at the supplies inside this months pack… Cardstock, 2 x pieces of Masterfully Made Designer paper and some Glimmer paper. Plus there is a the Extra materials pack featuring Basic White cardstock and some Iridescent pearls.

There is lots to get creating with here.

I made one card using just some of the supplies in this pack, but there is certainly enough to create more…

Here I sliced my Designer Paper into strips of different widths, then adhere them to some Basic White cardstock from the extra’s pack. Then adhered this to the cardbase in Berry Burst. 

To finish of the card I set about embellishing the front with the sentiment by die cutting the shape from the Nested Labels die set from the More Dazzle Glimmer paper. The sentiment came from Charming Sentiments bundle, which I stamped in Berry Burst ink to coordinate with the card base.

It’s simple but fun and easy to recreate, especially for those times when you don’t have a lot of time to create – which has been me for while!

Here are the ideas from our Global Demonstrators for this months kit:

Aude Barbara

Mikaela Titheridge

Until next time… Stamp Creatively,

Click to shop supplies used in this project:

Berry Burst Classic Stampin' Pad
Berry Burst Classic Stampin’ Pad
$11.50

Stampin’ Staples – Click to shop these commonly used crafting supplies:

Stampin' Seal
$14.00
Paper Trimmer
$46.00
Bone Folder
$12.25
Paper Snips
$19.25
Clear Block B
$12.25
Clear Block D
$16.75
Clear Block E
$23.00
Clear Block H
$16.75

Colour INKspiration – CI133

colink-blogbanner-v3

Well this colour combination certainly challenged me… I did have to think about this one a little. I think it was the inclusion of Merry Merlot and Gorgeous Grape in amongst those Greens. But that the game isn’t it?!!

So here is the colour palette for Colour INKspirations challenge #CI133 – Merry Merlot, Gorgeous Grape, Coastal Cabana, Granny Apple Green and Mossy Meadow. (Oh and …. Just take a look at that bird by the way, stunning!)

It’s a warm day here in Melbourne today, so I thought I’d play with an old technique that’s can be a bit on the wet side, so good for quicker drying on days like today. It’s the good ol’ Baby Wipe Technique. Here is the finished card…

Rose Packer, Creative Roses, Stampin' Up!, Birthday Wishes, Starburst, Baby wipe technique

For those who may need a fresher on the Baby Wipe technique, it’s quite fun and can be quite messy. Thankfully the way I used the technique, I managed to avoid severely inky fingers. Here are the steps I followed to create my background.

LEFT: I laid a baby wipe over my E Block and created an ink pad with it by dripping ink drops from a reinker bottle directly onto the wipe. Starting with Mossy Meadow and scattering a few drops around, then a few more of Granny Apple Green and lastly Coastal Cabana. (Note to self… next time, less mossy more cabana!).

MIDDLE: Next I grabbed the block with the baby wipe too, and used that as my ink pad and inked my stamp.

RIGHT: Then I laid a piece of Basic White cardstock over the top of my stamp and used to clear block to help evenly transfer the inked image to the cardstock.

It’s important to note – I had no clear idea of what I was going to create with this piece of art. I was just enjoying the ride! LOL!

When I saw the finished piece, the rest started to come to me… the Coastal Cabana colour was lost a little by the two stronger colours, so I brought that to the front by layering somecardstock behind my stamped layer. Before adhering these two layers together, I did distress the edges of my stamped layer and curl one corner too. These were layered on a Basic White Thick card base.

Rose Packer, Creative Roses, Stampin' Up!, Birthday Wishes, Starburst, Baby wipe technique

I finished off the card, by white embossing one part of a large sentiment onto some Grape cardstock – isn’t it great having the embossing buddy back!! I stamped the other half of the sentiment, bringing in some more of the Coastal Cabana colour and a few stamped dots of Merry Merlot.

ColINK-badge-v3

More INKspiration is loaded up over in our Facebook Challenge group. Head over and enjoyed all the amazing inspiration from the crew. We will be excited to have you play along with us. This challenge is open until Monday, November 21. Look forward to seeing you over on the group..

Until next time… Stamp Creatively,
RosePacker-SignOff

Click to shop supplies specific to this project:

Heat Tool
$53.00
Versamark Pad
$16.75

Stampin’ Staples – Click to shop these commonly used crafting supplies:

Stampin' Seal
$14.00
Paper Trimmer
$46.00
Bone Folder
$12.25
Paper Snips
$19.25
Clear Block B
$12.25
Clear Block D
$16.75
Clear Block E
$23.00
Clear Block H
$16.75

Colour INKspiration – #CI125

colink-blogbanner-v3

It’s been a little while since I’ve been able to play along and provide inspo in my Crew Designer role for Colour INKspiration. Needless to say I’m so very excited to post today with some inspo using the challenge colours. And what amazingly bold colours we have this time around… just take a look:

Love that inspo image too. I wonder if those cushions are still available? Hmm…

Anyway, here is the card I made using these colours.

Rose Packer, Creative Roses, Stampin' Up!, Colour & Contour, Biggest Wish, Split Card textures dies.

Starting with a cardbase of Starry Night and layered with some Designer Paper in the same colour, made for a bold base. I layered a piece of Starry Night cardstock with some Basic white that had been die cut using the amazing Split Card Textures dies. I love how this set of two dies cuts the texture into half the layer on an angle. It just creates a different look altogether.I went with a landscape orientation which allowed me to position the sentiment on the left. Here I have used Biggest Wish stamp set, stamping the Happy in Sorbet and Birthday in Pacific Point inks. Stamping the outline in Basic Gray ink, I then used the colouring stamps in Sorbet to colour the petals. I used Dimensionals to adhere the flower, giving it some height

It’s been a little while since I’ve been able to play along and provide inspo in my Crew Designer role for Colour INKspiration. Needless to say I’m so very excited to post today with some inspo using the challenge colours. And what amazingly bold colours we have this time around… just take a look:
Sweet Sorbet, Pacific Point, Starry Night and Basic Gray.
Love that inspo image too. I wonder if you could get more of those cushions? Hmm…
Anyway, here is the card I made using these colours.
Starting with a cardbase of Starry Night and layered with some Designer Paper in the same colour, made for a bold base. I layered a piece of Starry Night cardstock with some Basic white that had been die cut using the amazing Split Card dies. I love this set of two dies, that cuts a texture into half the layer on an angle. I love how different this is.
I went with a landscape orientation which allowed me to position the sentiment on the left. Here I have used Biggest Wish stamp set, stamping the Happy in Sorbet and Birthday in Pacific Point inks. I added a little flower detail to the right, this one came from the Colour & Contours stamp set. Stamping the outline in Basic Gray ink, I then used the colouring stamps in Sorbet to colour the petals. I used Dimensionals to adhere the flower, giving it some height.
To finish the card, I added some Faceted Gems in Sorbet to flick some colour around the card.

To finish the card, I added some Matte Decorative Dots in Sorbet to flick some colour around the card.

ColINK-badge-v3

More INKspiration is loaded up over in our Facebook Challenge group. Head over and enjoyed all the amazing inspiration from the crew. We will be excited to have you play along with us. This challenge is open until Monday July 25th. Look forward to seeing you over on the group..

Until next time… Stamp Creatively,
RosePacker-SignOff

Click to shop supplies specific to this project:

Product List

Stampin’ Staples – Click to shop these commonly used crafting supplies:

Stampin' Seal
$14.00
Paper Trimmer
$46.00
Bone Folder
$12.25
Paper Snips
$19.25
Clear Block B
$12.25
Clear Block D
$16.75
Clear Block E
$23.00
Clear Block H
$16.75

You Can Create It – February Ideas

This month pack in the You Can Create It kit features Designer paper from the Crane of Fortune suite in the Mini Catalogue. I love that on one side you get patterns/imagery in lots of neutral tones, some set off with gold foiling… then on the reverse side, some designs are bright and colourful.

First let’s take a look at what we had to play with, in the February kit…

I have created two cards, as I wanted to showcase the different sides of the paper.

Starting with the card on the right… I have trimmed some of the designer paper down so I could use both patterns. Here I have created a little window with some crumb cake cardstock to poke through one of the patterns and simply layered the over the top. A simple sentiment finished off this card.

This next card, I wanted to showcase the bright side of the second piece of Designer Paper… so here I have layered it with some of the Soft Succulent cardstock onto a cardbase in Evening Evergreen. Again just finishing with die cut shapes for the sentiment.


TiP : to make your cardstock go further, use the parts that you wont see… IE: die cut shapes from the parts of the cardstock that will be covered by another layer. It’s a great way to stretch your supplies.


For the sentiment, I stamped it in Evening Evergreen ink and used a little of the same colour with my blending brush to create a soft tone on tone effect in the middle of the shape. I stamped a little flourish in Calypso Coral to echo the brightness, plus I like the swirly font of the “birthday” I thought they matched! I just had to finish off this card with some bling – just a few pieces from my stash – these are the new Iridescent Rhinestone jewels -which I love to death as they change colour to match what you are creating with!!

Here are the ideas from our Global Demonstrators for this months kit:

Aude Barbara

Simone Bartrum

Karina Chin

Linda Cullen

Heikle Fallwicki

Karen Hadler

Danielle Kassing

Anja Luft

Mikaela Titheridge

Until next time… Stamp Creatively,

Click to shop supplies used in this project:

Stampin’ Staples – Click to shop these commonly used crafting supplies:

Stampin' Seal
$14.00
Paper Trimmer
$46.00
Bone Folder
$12.25
Paper Snips
$19.25
Clear Block B
$12.25
Clear Block D
$16.75
Clear Block E
$23.00
Clear Block H
$16.75

Colour INKspiration – CI114

colink-blogbanner-v3

I’m excited to begin another year of inspiration with the Colour INKspiration crew. It’s my fifth year, having started at the beginning. We have another year of great colour combinations and inspiration coming up, I can just feel it! Beginning with this one tonight….

This time we are playing with Sahara Sand, Balmy Blue, Coastal Cabana, Pacific Point and Granny Apple Green. Lots of colours to include for this first one. The image of the beach is equally as inspiring… wouldn’t you just love to sit on that beach with cocktail that has an umbrella in it?!! Yeah… me too…

That alone was inspiration enough for my card this time…

Here I have used the Paradise Palms Bundle, now available in the January MINI Catalogue. There is lots to get excited about with this bundle as it features many palm trees in both stamps and dies.

I team up my blending brushed and Coastal Cabana and Balmy Blue inks to create the sky of this little scene. Using Sahara Sand ink, I stamped a sandy beach across my card. Layering a die cut of reeds and a single palm tree, created with some of the dies from the set.

Finishing with just a simple sentiment in Pacific Point ink, the card is quite simple and doesn’t contain too many layers or embellishments. Very reflective of how things would be if lying on that beach! Now where is that Banana lounge and cocktail … Hmm?

ColINK-badge-v3

More INKspiration is loaded up over in our Facebook Challenge group. Head over and enjoyed all the amazing inspiration from the crew. We will be excited to have you play along with us. This challenge is open until 7pm, February 7th. With extra time to play along with this challenge, I really do look forward to seeing you over on the group..

Until next time… Stamp Creatively,
RosePacker-SignOff

Click to shop supplies specific to this project:

Stampin’ Staples – Click to shop these commonly used crafting supplies:

Stampin' Seal
$14.00
Paper Trimmer
$46.00
Bone Folder
$12.25
Paper Snips
$19.25
Clear Block B
$12.25
Clear Block D
$16.75
Clear Block E
$23.00
Clear Block H
$16.75

Hello Ladybug

Let me introduce you to the newest cutest little Ladybug on the planet…. It’s the Hello Ladybug bundle, featuring a stamp set by the same name and the Ladybug builder punch.

Rose Packer, Creative Rose, Stampin' Up!, Hello Ladybug

I created this gorgeous little card, for my little ray of Sunshine when she turned seven years old just a couple of weeks ago. Yes, I have had these products since the beginning of December. As demonstrators we get early access to new products before customers, it’s just a perk of being part of the Stampin’ Up! family.

Oh yeah… the card… I created this one featuring the Ladybug as it’s intended – I punched the body from Basic Black cardstock, stamped the wings in Real Red ink and punched them out. I used glue dots to adhere them. I really wished I had some small googly eyes… I think that would have set these bugs off!

As I was creating her, as much as I love a ladybug, I could see a butterfly in those wings too. So I set about creating one to match in with my bug. I stamped two more wings and punched them out. I die cut a body from Basic Black cardstock, using the Brilliant Wings die set.

I set these two creatures over a leaf stamped in Granny Apple Green ink, I die cut this using layering circles dies to create a raised element. Now I know Ladybugs have black spots, not white ones – there is a stamp in the set designed to colour those spots in, but I decided to leave those for now, as this was my first play!

Oh, And… just because I couldn’t leave them out… I added a Bumblebee trinket, to sit in with my two insects.

Rose Packer, Creative Rose, Stampin' Up!, Hello Ladybug

This was all set over a cardbase in Crushed Curry cardstock, layered with a piece of Basic White cardstock, which I stamped with the large flower in the stamp set. For some interest I used the Generational stamping technique to create some lighter shaded flowers, which makes great contrast.

I just love this bundle, it’s a great solid image stamp set, that creates crisp flat coloured images. I’ll be using this stamp set more and more as it’s just so versatile not only for kids cards, but for many other occasion too.

Until next time… Stamp Creatively,

Click to shop supplies used in this project: (COMING SOON!!)

Stampin’ Staples – Click to shop these commonly used crafting supplies:

Stampin' Seal
$14.00
Paper Trimmer
$46.00
Bone Folder
$12.25
Paper Snips
$19.25
Clear Block B
$12.25
Clear Block D
$16.75
Clear Block E
$23.00
Clear Block H
$16.75

Faux Felt – remember this ol’ beauty….

I remember creating Faux felt elements with the old Scallop circle black whale-style punch. At the time, it was like the most wow thing! If you are not sure what I’m talking about or if this technique is buried in the depth of your crafting brain, here is a reminder….

Faux felt is when you break the fibres of the cardstock to separate the layers, revealing the fluffy inside, which resembles felt. You can do a lot with this technique and when used well, it can create an amazing effect. Here is a card I made using this technique…

Rose Packer, Creative Roses, Stampin' Up!, Poppy Moments dies, Forever Flourishing dies

So how do you go about creating this… You’ll need some cardstock and a bone folder. You can die cut or punch out shapes from the cardstock or depending on what you would like to do, you may just like to use a piece as a background layer.

Hold the cardstock between your thumb and the bone folder and gently but firmly, pull on the cardstock from the centre out to the edge. Rotate the cardstock. Repeat. Repeat this process until the fibres break down, allowing it to be pulled apart. Depending on the size of the piece of cardstock you are working with, this could take a good 5 minutes.

The length of time, could be dependent on the quality of the cardstock too. Stampin’ Up! cardstock is perfect for this technique, as it does separate well and it is dyed all the way through, so when you separate the layers, the colour is true.

Rose Packer, Creative Roses, Stampin' Up!, Poppy Moments dies, Forever Flourishing dies

This technique just gives your projects a lovely texture as it contrasts against the smooth surface of regular cardstock. This can be a great technique to use for many different and interesting projects!

Until next time… Stamp Creatively,

Click to shop supplies used in this project:

Stampin’ Staples – Click to shop these commonly used crafting supplies:

Stampin' Seal
$14.00
Paper Trimmer
$46.00
Bone Folder
$12.25
Paper Snips
$19.25
Clear Block B
$12.25
Clear Block D
$16.75
Clear Block E
$23.00
Clear Block H
$16.75

Henna Hearts are kissing

Here we are, those of us living in Melbourne, are half way through lockdown number 5. Hoping this one really is the short sharp one we need to get ahead of the Delta variant of Coronavirus making it’s presence felt in our lovely city.

The one great thing about a lockdown is no rushing around in a busy life – work, the school run, kids activities, shopping, other jobs – it all come to a screaming halt and we just stay home and catch up on other jobs around the house, we keep putting on hold. For me, lockdowns mean extra crafting time!!

Rose Packer, Creative Roses, Stampin' Up!, Henna Hearts, Kissing technique

The inspiration for this technique I am sharing with you today, came off the back of seeing a combination of other cards while scrolling social media. The idea sparked and I set about trying it out and creating a project for class earlier this month. The project was a hit with my class ladies and I wanted to share it with the Web-world too.

Rose Packer, Creative Roses, Stampin' Up!, Henna Hearts, Kissing technique

This is an old technique, one I first learned when I started stamping more than 10 years ago. I don’t know why it dropped off my radar, I guess with the development of die-cutting machines and techniques and mixed media products coming about, there was more to learn.

Rose Packer, Creative Roses, Stampin' Up!, Henna Hearts, Kissing technique

It’s the Kissing Technique and the Henna Hearts stamp set, is perfect for it. This is where you stamp the stamp, then stamp on your project. Sounds simple enough, right?!

https://youtu.be/uRu1NDzV3dA

To make it easier I have created a video to show you the steps. Whether this is new for you, or it’s a refresher course, join me as I make two cards, showing the steps to making stamps kiss.

Until next time… Stamp Creatively,

Click to shop products specific to this project:

Stampin’ Staples – Click to shop these commonly used crafting supplies:

Stampin' Seal
$14.00
Paper Trimmer
$46.00
Bone Folder
$12.25
Paper Snips
$19.25
Clear Block B
$12.25
Clear Block D
$16.75
Clear Block E
$23.00
Clear Block H
$16.75

Colour INKspiration – #CI88

colink-blogbanner-v3

This next colour challenge over at Colour INKspiration is just amazing. The colours are dramatic which is just my cup of coffee (I don’t really drink tea!). They are Pretty Peacock, Just Jade, Crushed Curry and Crumb Cake.

Photo credit: https://www.muralswallpaper.com/shop-murals/almond-branches-van-gogh-wallpaper/

The image itself is an inspiration, I just love the splashes of Crushed Curry in amongst the dark shades of Green. I tried to capture that here on my card…

I used the Forever Flourishing die set – How yummy are those dies?! On this card, I created the dark dramatic background with a Pretty Peacock card base and an embossed layer of Just Jade cardstock. Then added my splashes of Crushed Curry. 

Rose Packer, Creative Roses, Stampin' Up!, Forever Flourishing dies, Itty Bitty Birthday stamp set, Ornate Frames

I wanted to create a two tone die cut, from one of the leaves dies, to make it look like it had flowers. I set my thoughts around how to achieve this in the least fiddly way! My first thought was to cut and stick the individual flower heads. Waaaay to fiddly! So here is how I created the element….

  • First, I die cut two of the same elements out, one from Crumb Cake to use for the stems and one from Crushed Curry to use as the flowers.
  • I applied liquid glue to only the flower head parts of the leaves die cut and adhere them directly on top of each other.
  • Once dry, I used my super sharp and point Paper Snips to carefully trim off all the Curry stems, leaving behind the Curry flower heads and exposing the Crumb Cake stems beneath.
Rose Packer, Creative Roses, Stampin' Up!, Forever Flourishing dies, Itty Bitty Birthday stamp set, Ornate Frames

I finished off the card with some Gold Metallic thread and some of those yummy Gold Glitter enamel dots. The sentiment came from the Itty Bitty Birthday stamp set and I used two of the coordinating dies from the Ornate Frames die set to layer with.

ColINK-badge-v3

More INKspiration is loaded up over in our Facebook Challenge group. Head over and enjoyed all the amazing inspiration from the crew. We will be excited to have you play along with us. This challenge is open until Monday, November 9th. Look forward to seeing you over on the group..

Until next time… Stamp Creatively,
RosePacker-SignOff

Click to shop supplies specific to this project:

Stampin’ Staples – Click to shop these commonly used crafting supplies:

Stampin' Seal
$14.00
Paper Trimmer
$46.00
Bone Folder
$12.25
Paper Snips
$19.25
Clear Block B
$12.25
Clear Block D
$16.75
Clear Block E
$23.00
Clear Block H
$16.75