Little Latte inside window

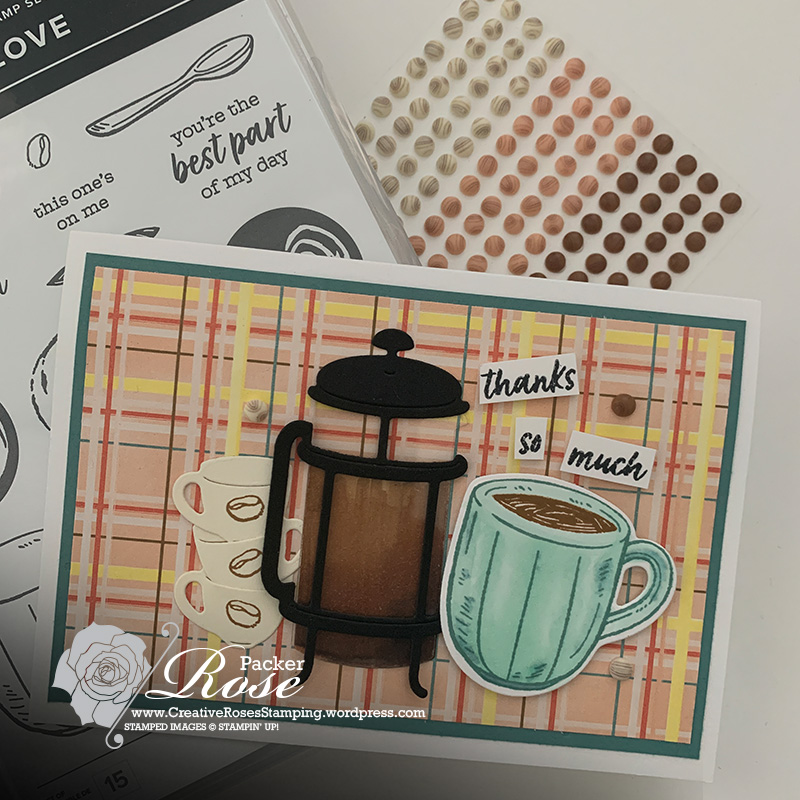
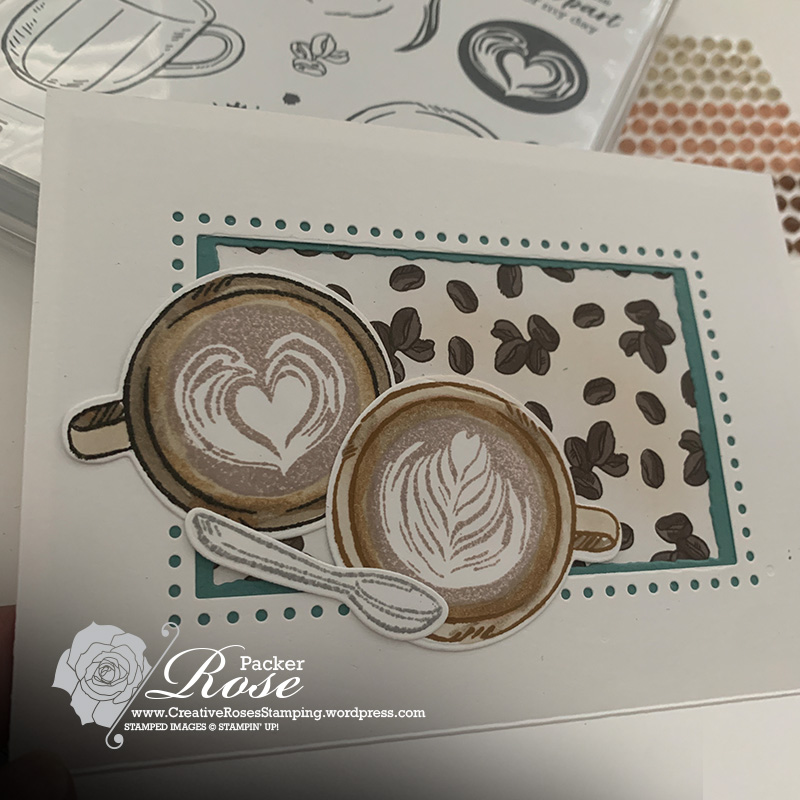
Today, I want to share with you a video tutorial for a card I created that has an inside window. I had this idea as there are so many sheets of designer paper where I totally love both sides of the design. I found that because I couldn’t decide which one to use, I didn’t use them at all. Are you like this too?

So I had an idea for a card design that showcases both sides. What I like about this card design, is that you don’t have to cut and flip the piece. Just cut the designer paper into a layer like you would normally and let the card base do all the work for you.

To learn how to make a card like this, watch my latest YouTube video here:

I hope you enjoy the creativity shared here and it inspires you to give it a try.

Until next time… Stamp Creatively,

Click to shop supplies used in this project:

Stampin’ Staples – Click to shop these commonly used crafting supplies:

Stampin' Seal
$14.00
Paper Trimmer
$46.00
Bone Folder
$12.25
Paper Snips
$19.25
Clear Block B
$12.25
Clear Block D
$16.75
Clear Block E
$23.00
Clear Block H
$16.75

Colour INKspiration – CI136

colink-blogbanner-v3

Welcome to the first official Colour INKspiration challenge for 2023 – #CI136. As soon as I saw this colour palette I was so excited… hmm, maybe it was that gorgeous couch in the inspo image. Doesn’t it just look like marshmallows stuck together and make you want to run and jump on it? Here, let’s take a look…

The challenge colours are Blushing Bride, Mint Macaron, Garden Green and Sahara Sand. Plus of course you can add Black, White and Metallics to create with.

Here I was inspired by that curvey pillowy couch and went in a different direction… I have focussed my energy and creativity on the background for this card.

Rose Packer, Creative Roses, Stampin' Up!, Biggest Wish, Watercolour Shapes, Decorative Borders

Using the Watercolour Shapes stamp set, I stamped circles in Mint Macaron ink and squares in Garden Green. I use my White Sign-glo pen to add some detail patterns to the stamped images. 

Over the top, I used a new stamp set from the January Mini Catalogue called Decorative Borders. This set features a range of imagery designed to work as a border and here I have chosen one that is mostly line work, and stamped it in Sahara Sand ink, following along the diamond shape.

Rose Packer, Creative Roses, Stampin' Up!, Biggest Wish, Watercolour Shapes, Decorative Borders

Adding a little more detail by stamping the cross shapes from the Biggest Birthday stamp set, in Sahara Sand ink just topped it off. Finishing the card with a very simple sentiment – thanks also from the Biggest Birthday in Blushing Bride.

The background was created on some Shimmery White cardstock and layered on Blushing Bride cardstock and featured on a cardbase in Sahara Sand. Very simple in layering but fun to create.

ColINK-badge-v3

More INKspiration is loaded up over in our Facebook Challenge group. Head over and enjoyed all the amazing inspiration from the crew. We will be excited to have you play along with us. This challenge is open for four weeks and closes Monday February 6th. Where we will resume our regular fortnightly timetable. Look forward to seeing you over on the group..

Until next time… Stamp Creatively,
RosePacker-SignOff

Click to shop supplies specific to this project:

Stampin’ Staples – Click to shop these commonly used crafting supplies:

Stampin' Seal
$14.00
Paper Trimmer
$46.00
Bone Folder
$12.25
Paper Snips
$19.25
Clear Block B
$12.25
Clear Block D
$16.75
Clear Block E
$23.00
Clear Block H
$16.75

Lovely Layers Vellum

Today I wanted to share a quick and easy idea using the Lovely Layers Vellum pack. This is a pack of vellum – some plain and some pre-printed – all card front size. They fit Notecards really well, and while they are imperial measurements, they still work well on our metric card size.

Working with vellum is always a little tricky, as the see-through nature means you need to think about adhesive placement. This design idea works well for that. 

The vellum pack actually comes in a bundle, it has a stamp set with coordinating leaves as this printed layer I am using here. Any leaves will work for this design though, my leaf stamp comes from the Cup of Tea stamp set.

I love the pop of colour – this is Parakeet Party against Basic white, Basic Gray and Smokey Slate. Here I have teamed it up with a couple of punches and the Charming Sentiments bundle. That glimmer paper is something else isn’t …. Here take a look at this quick video.

Until next time… Stamp Creatively,

Click to shop supplies used in this project:

Bough Punch
$34.00

Stampin’ Staples – Click to shop these commonly used crafting supplies:

Stampin' Seal
$14.00
Paper Trimmer
$46.00
Bone Folder
$12.25
Paper Snips
$19.25
Clear Block B
$12.25
Clear Block D
$16.75
Clear Block E
$23.00
Clear Block H
$16.75

CTC287 – Case a Mini Catalogue leaf/tree project

Hello there, welcome to another hop with the Caseing the Catty crew, you may have joined me from Monique or starting here with me – welcome. We are really mixing up challenges this – I’m enjoying them and hope you are too. This week is sure to get the thinking cap on – well, I know for me it did!

This weeks’ challenge is casing a project featuring trees on it, from the Mini Catalogue. See what I mean…. I had to put my thinking cap on too! But once I started looking at all the amazing projects, the inspiration hit me.

My inspiration came from the card on the right of this group. I think it was the circle shape that called to me. So here is what I created….

Rose Packer, Creative Roses, Stampin' Up!, Love of Leaves

Using my new favourite this week, Love of Leaves bundle featuring this amazing stitched detail. I used the background stitched lines die to add texture to the background before overlaying my elements. Starting with circle in Early Espresso cardstock, I layered this with the largest of the leaves stamped in Mint Macaron ink. I die cut it using the frame and used the texturiser die. I adhere this flat to my circle with Multipurpose liquid glue. The next layer was one of the lovely Laser Cut Gold images from the Forever Fern Suite. They are just so lovely and so bright.

Next I layered another leaf over the top, this one I die cut from Early Espresso cardstock and used the texturiser die over the top to add in vein detail of the leaf. They are just so so lovely! I finished this cluster off with a simple bow tied from the Gold Twine that available in the Wonder of the Season ribbon combo pack.

Rose Packer, Creative Roses, Stampin' Up!, Love of Leaves

I layered my cluster over some Bumblebee gingham ribbon and adhere this on a card base in Cinnamon Cider – oh I just luuurve this colour!

I finished off the card with a simple sentiment, which I stamped in Early Espresso.

Next up in the hop is the amazing Lauren Meiklejohn.

After you’ve enjoyed the awesome hop with the team, I’m looking forward to seeing your CASE over in our challenge group. Be sure to load up your creation by 7pm next Sunday night, October 4th.

Until next time… Stamp Creatively,

Click to shop supplies specific to this project:

Stampin’ Staples – Click to shop these commonly used crafting supplies:

Stampin' Seal
$14.00
Paper Trimmer
$46.00
Bone Folder
$12.25
Paper Snips
$19.25
Clear Block B
$12.25
Clear Block D
$16.75
Clear Block E
$23.00
Clear Block H
$16.75

Ornate Garden Suite – Early Release

ORNATE_GARDEN-Banner2_600px

Country Garden meets Vintage style… get your first look at the 2020 Annual Catalogue with this early release suite. If this is anything to go by… the 2020 Annual Catalogue, coming this June, is going to be awesome.

This suite available from today, through May leading into the new catalogue… and it’s just gorgeous.

As the name suggests, the suite has a lovely country garden feel with the feeling of an abundance of flowers in their design.

Here is a sample of what I’ve been playing with:

Rose Packer, Creative Roses, Stampin' Up!, Ornate Garden suite, Ornate Style bundle, Ornate Style stamp set, Ornate Layers dies

The suite features two bundles, Specialty Designer paper, Embossing folder, Ribbon combo pack and Gilded Gems (I’m such a sucker for gems…. I’ve bought three packs already!).

The suite is available a couple of ways:

  • Purchase the whole collection in one hit;
  • Purchase the bundles individually (saving 10%); or
  • Purchase your favourite items individually.

Once you have purchased your products and they have arrived… come back and get inky with me. Let me help get your creative juices flowing and make this card with me: the dimensions are at the bottom of this post, and the steps in my latest YouTube video….

See the Ornate Garden suite of products here at my Stampin’ Up! online store:

RosePacker-ShopTODAY

You can shop while there – don’t forget to use this months host code (Click the home button above and the code is on the right). Or contact me and I’ll help you directly.

Until next time… Stamp Creatively,
RosePacker-SignOff

Ornate Garden Card products & dimensions:

  • Cardbase: Very Vanilla Thick cardstock. Cut an A4 sheet in half to 148.5mm x 210mm, score in half at 105mm
  • So Saffron cardstock layer: Cut to 70mm x 148mm. Cut one of the longer edges on an angle to your liking. Emboss with the Ornate Flowers 3D embossing folder
  • Speciality Designer Series Paper: Cut a strip to 148mm x 50mm
  • Gold Frame is die cut from Gold foil
  • Stamping is completed on Very Vanilla cardstock

Other products used Ornate Garden Card are:

CTC265 – Week 2 – 2nd Release SAB

CTC-BlogBanner

I’m back hoping along with the Caseing The Catty crew for week 2 inspiration of Sale-a-Bration’s second release. There is where we share more inspiration from the second release catalogue, with so many ideas inside it was certainly hard to choose just one.

CTC265

I settled on this layout from page 7. It’s the one at the back, using the gorgeous Mint Vellum…

2020_SAB2_P_5A-3_500px

I just love the simplicity and ease of which you can create cards for any occasions using this layout. Here is my card…

Rose Packer, Creative Roses, Stampin' Up!, Ornate Garden suite

If these products don’t look familiar and have you guessing where they come from, you’re not going crazy. This is the Ornate Garden Suite that is coming next month. It’s an early release from the 2020 Annual Catalogue. So today, I have a little sneak peak post for you too.

The suite features two bundles. Here I have used one from the Ornate Border Die set. These dies are shaped in strips and work well on the edge of your card stock, but can work many different ways of course. Here I thought it would work beautifully on the angled edge, just like the sample.

Starting with a card base in Whisper White thick cardstock, I layered some of the Ornate Flowers Specialty Designer Paper from this suite. I went with this one, in Mint Macaron that features some lovely gold foiling. The paper in the suite features lovely garden style flowers patterns featuring lots of colour on one side and more muted and less busy design, most a monochromatic or feature Gold foiling detail. You are just going to love it!

RosePacker20_09b

I die cut the border design from Whisper White cardstock and trimmed the Designer paper around the bottom edge of the pattern, so that they sat neatly together.

There are some layering pieces included in the die set too which I used two to add some very simple embellishment with. To finish, I have topped them the Guilded Gems that come in the suite. I love these, I love how they are a solid gold look, rather than a gold backing beneath a clear gem.

Rose Packer, Creative Roses, Stampin' Up!, Ornate Garden suite

All the details on this gorgeous suite are coming April 1st so stay tuned.

Next up in the hop is the amazing Sandra Collett.

CTC-Next

After you’ve enjoyed the awesome hop with the team, I’m looking forward to seeing your CASE over in our challenge group. Be sure to load up your creation by 6pm next Sunday night, March 29.

CTC-BlogBanner2

Until next time… Stamp Creatively,
RosePacker-SignOff

Click to shop these supplies: (Ornate Garden suite available April 1st)

Colour INKspiration – CI66

colink-blogbanner-v3

What an amazing colour combination the Colour INKspiration crew have in store for you this challenge hop. Welcome if you are joining me here or if you have hopped over from Julia, I know you will enjoy this hop.

Here is our inspirational image and colour combination is made up of many colours and we decided to focus on a minimum of three from this collection…

CI66

I was inspired by this image of flowers and decided to go with a stamp set I haven’t used a lot of lately – Vibrant Vases. This stamp set was kind of part II to the Vase Builder stamp set, that was new to the collection in the last Annual catalogue. It gave us more reason to play with the Vase punch, after we thought we may have used it enough… is there really such a thing in the crafting space… as enough!

The colours I focussed on are Coastal Cabana, Gorgeous Grape, Lovely Lipstick and Mint Macaron. Here are my creations…

Rose Packer, Creative Roses, Stampin' Up!, Varied Vases, Vase Builder Punch

I needed some little note cards this week, so here I have pulled out my Gallery Grunge stamp set, for a lovely textural background. I love the image of the parquetry style boards. Here I stamped it in Mint Macaron for a background effect. Then I set about creating my feature elements… the vases and flowers. I alternated colours to keep things interesting.

Rose Packer, Creative Roses, Stampin' Up!, Varied Vases, Vase Builder Punch

The Vibrant Vases stamp set, is a two-step stamp set, meaning there are two part to the one image. You can just choose to use the outline stamp on it’s own and leave it as is or even colour it in other ways, like pencils. But for a quick and easy stamping fix using the filler stamp makes creating a breeze. Plus being a disINKtive style stamp set means you get a tonal range stamped with the ink, making your projects look like you’ve spent hours watercolouring them! In my creations, I did stamp off the background images, so that it stamped a lighter shade again.

Rose Packer, Creative Roses, Stampin' Up!, Varied Vases, Vase Builder Punch

I punched the vases and the tuplip stamped images using the punch, and fussy cut the larger flowers. I set my flowers on different types of Purple ribbons.

I love a simple design, it makes for interchanging colours and elements really easy for fast creations that a slightly different too.

Next up in the hop is the amazing Lou Kitzelman.

ColINK-NEXT-v3

Once you have enjoyed all the amazing inspiration in this hop, pop over to our Facebook Challenge group and load up your creation using these colours. This challenge is open until Monday, November 11th. Look forward to seeing you over on the group.

Until next time… Stamp Creatively,
RosePacker-SignOff

Click to shop these supplies:

CTC251 – Brightly Gleaming Combination Case

CTC-BlogBanner

The Caseing The Catty Crew are back this week with a double combination case. So exciting!! Welcome if you are joining me here or if you have hopped over from Sandra. Grab a cuppa and enjoy this weeks inspiration.

The challenge this week is using the colour combination from the Brightly Gleaming Designer paper – Night of Navy, Pretty Peacock, Mossy Meadow, Very Vanilla and Copper. Plus we are casing layouts from page 30 in the Holiday catalogue.

CTC251

The two colours I focused on this week are Pretty Peacock and Copper and the card layout I chose was the one at the bottom of the image above.

The theme for my card is not Christmas though, I love how you can mix things up and draw inspiration from any of Stampin’ Up! catalogues to use for your purpose at hand.

Rose Packer, Creative Roses, Stampin' Up!, Brightly Gleaming, Pretty Peacock, Well Written dies, Noble Peacock foil

Here I have used Pretty Peacock card base and embossed it with the subtles embossing folder. I layered some of the Noble Peacock Designer Foil in the same colour and wrapped the Scallop edge linen trim around and topped it with a bow.

I really didn’t want to cover the gorgeous patter in the foil up completely, so opted to use some Vellum instead. Here I die cut a shaped from the Stitched Label dies and used a little snail across the bottom to beneath the ribbon to adhere it. I used some strategically place glue dots to hold the ribbon in place.

Rose Packer, Creative Roses, Stampin' Up!, Brightly Gleaming, Pretty Peacock, Well Written dies, Noble Peacock foil

I die cut a simple “Thanks” sentiment from Well Written dies from copper foil and adhere over the top of the vellum and finished off the card with a few of the Star Designer elements.

Next up in the hop is the amazing Monique Fielder.

CTC-Next

After you’ve enjoyed the awesome hop with the team, I’m looking forward to seeing your CASE over in our challenge group. Be sure to load up your creation by 6pm next Sunday night, October 27th.

CTC-BlogBanner2

Until next time… Stamp Creatively,
RosePacker-SignOff

Click to shop these supplies:

CTC248 – Casing layouts

CTC-BlogBanner

Here we are back with the Casing The Catty Crew… and the theme for this week is Casing a layout from either catalogue – Annual or Holiday. You are in for a real treat with the great inspiration being shared in this hop. So grab a cuppa and get comfy for a great hop.

CTC248

I love casing layouts, they are truly a great way to get projects done quickly when you don’t have a lot of time. And it beats buying an expensive mass produced card too. I cased the following card from page 72 of the Annual Catalogue.

2019_AC_P072-500px

I love these dies and I know I’ll be back with more inspiration using them as they coordinate with my other Annual favourite – the Heirloom suite. You just wait… but for now, I went with using the little dies in the set to create this card.

Rose Packer, Creative Roses, Stampin' Up!, Petal Label dies, Tropical Chic, Brightly Gleaming

I used some Brightly Gleaming Specialty paper as it’s not really so Christmas in all designs. Like this one here, with the copper foil flourish design. I layered over some Pretty Peacock cardstock base. I used some Soft Seafoam cardstock to coordinate – I like the tone on tone here, it brightens up the card without taking over.

RosePacker19-35b

Using some Rococo Rose scallop edge ribbon to layer with and add some texture, I used coordinating cardstock for the flag and ink for the sentiment. The main frame around the sentiment is copper foil punched using the smaller dies from the Petal Labels dies set. To top it off I added some Linen thread behind a Designer Element embellishment.

Ever wonder how to layer an embellishment like this over some ribbon or thread? In this instance I tried to keep the thread as flat as possible. So instead of it being tied in a bow, the back looks like this…

Rose Packer, Creative Roses, Stampin' Up!, Designer Elements, How to

I used the glue dot on the back of the element to hold my thread in place as I looped it around to make it look like a bow. I used the grid on the paper to help get the loops looking even. Then I added another glue dot over the top to hold it securely and make sure it adhered to my project really well too.

Next up in the hop is Siobhan Fitzsimmons.

CTC-Next

After you’ve enjoyed the awesome hop with the team, I’m looking forward to seeing your CASE over in our challenge group. Be sure to load up your creation by 6pm next Sunday night, October 6th.

CTC-BlogBanner2

Until next time… Stamp Creatively,
RosePacker-SignOff

Click to shop these supplies:

CTC227 – Favourite Retiring Bundle

CTC-BlogBanner

Okay, so I always find it really hard to choose favourites, I mean, really, isn’t everything a favourite one way or another. This week the Caseing The Catty crew are focussing on favourite bundles. So sit back and grab a cuppa for some last inspiration using these retiring favourites.

CTC227

For this challenge I decided to go with this bundle – Floral Frames. It’s made up of the Floral Frames stamp set and the Foliage Frame framelit dies. I’m really sad they are retiring, they were new additions to the current catalogue and I kind of feel like they haven’t had enough time to shine. I love the stamp designs, they are just so lovely, you can create a simple stunning card, But my favourite things is the way the stamps and dies overlap making it really easy  to create depths with layers. My inspiration came from the card featured on page 135 of the Annual catalogue.

2018_AC_P135_C_500px

Here is my card.

Rose Packer, Creative Roses, Stampin' Up!, Floral Frames stamp set, Foliage Frames thinlits

I love the die with the foliage that emerges from the side of the circle. It’s just so lovely and creates a great frame for a circle centre feature. Whether that be a sentiment or more imagery.

Here I decided to create window to peak through. With the sentiment stamped on the inside, a window brings to the front of the card too.

First, I stamped the large circle stamp with foliage on the card front in Tranquil tide. I coloured some of the leaves with my Lemon Lime Twist marker and then overlayed the die-cut, but offset the foliage so that you can still see many of the elements.

Using one of the layering circle framelits, I punched the window through the centre of the layers. This allowed me to stamp the sentiment through the window so that it aligns nicely in the centre.

Rose Packer, Creative Roses, Stampin' Up!, Floral Frames stamp set, Foliage Frames thinlits

Then I decorated the top with some stamped, punched and coloured flowers plus a couple of additional leaves punched from Lemon Lime Twist cardstock. I added some Wink of Stella to the flowers and to the Lime leaves (it’s always hard to photograph!), which adds a lovely shimmer. To finish off, I scattered some pearls from the Share what You Love Artisan Pearls pack.

This design works for many occasions, I have even made a Mothers Day card.

Rose Packer, Creative Roses, Stampin' Up!, Floral Frames stamp set, Foliage Frames thinlits

Next up in the hop, is the amazing Elizabeth Gross.

CTC-Next

After you’ve enjoyed the awesome hop with the team, I’m looking forward to seeing your CASE over in our challenge group. Be sure to load up your creation by 6pm next Sunday night, May 12.

CTC-BlogBanner2

Until next time… Stamp Creatively,
RosePacker-SignOff

Click to shop these supplies: