Rock n Roll Suite

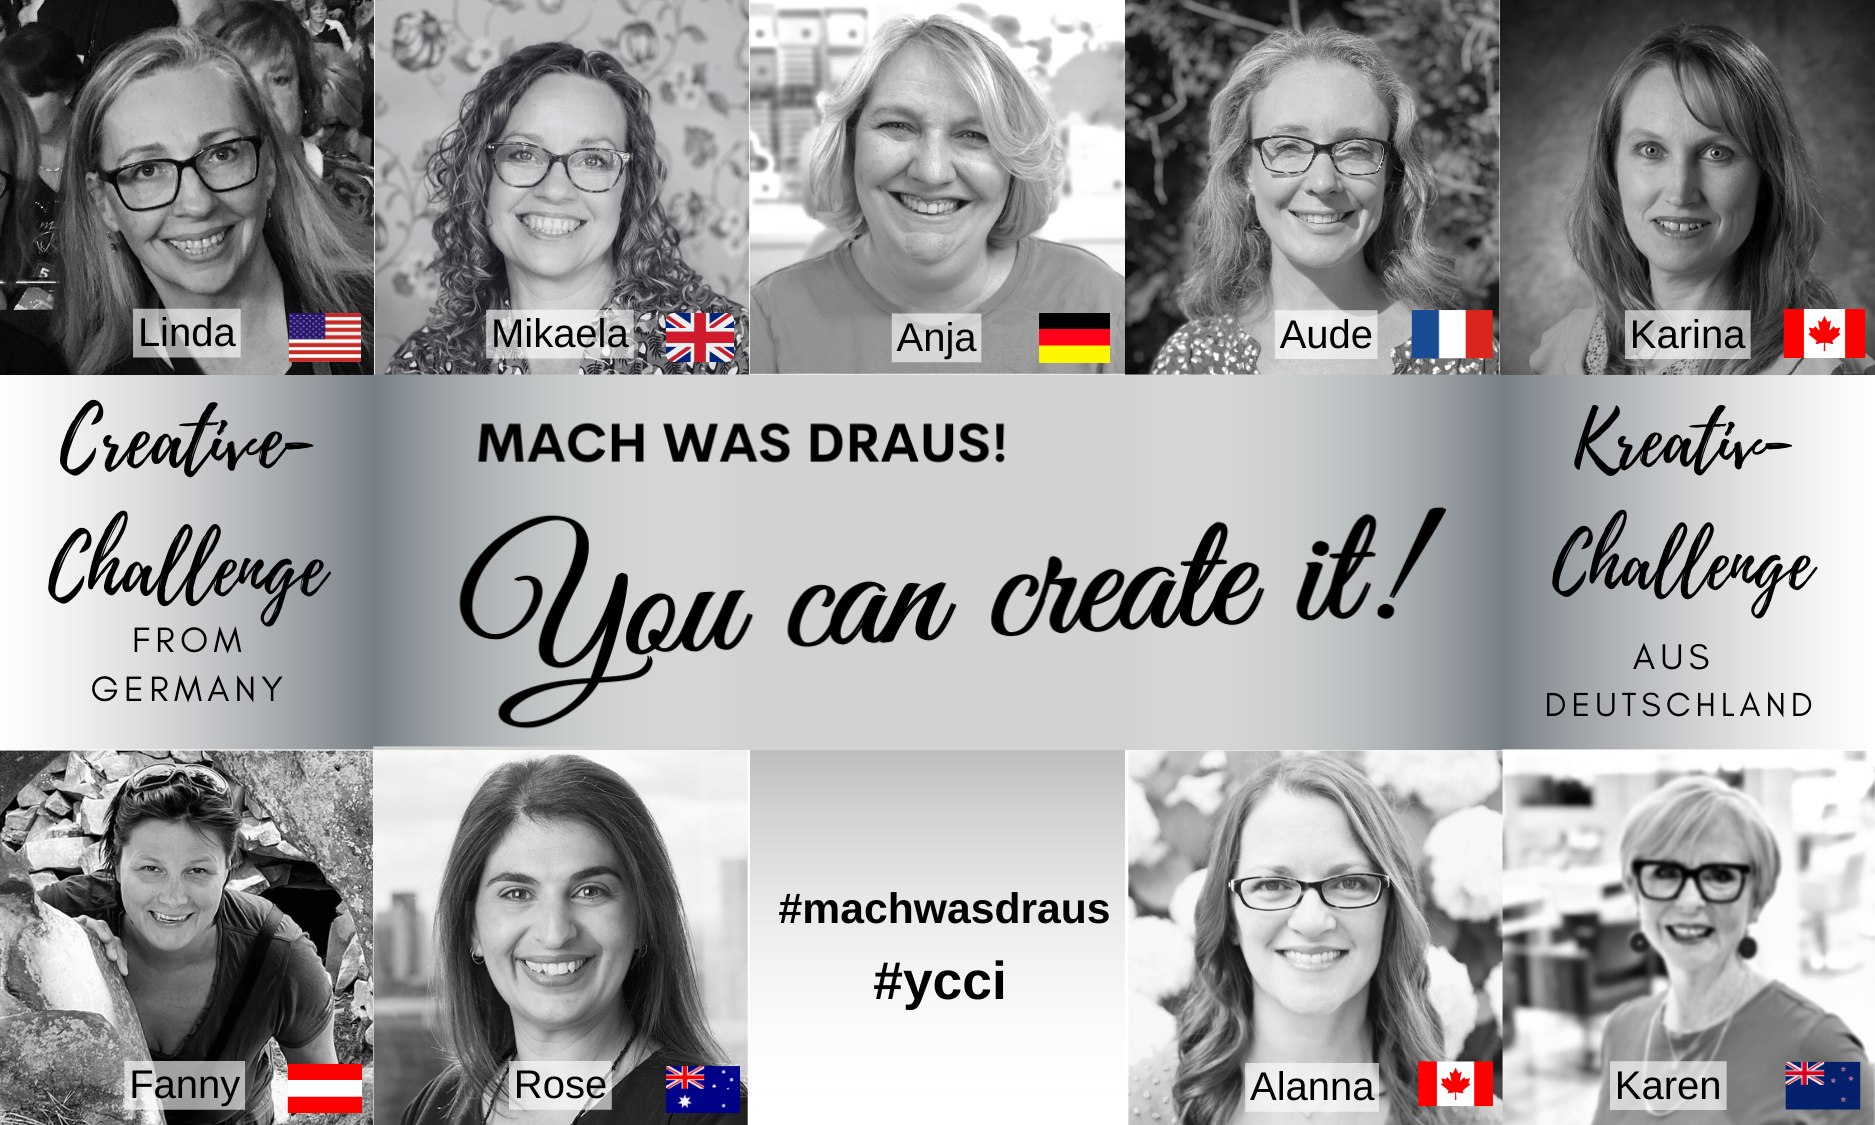
Calling all Muso’s! What a great little collection of Music themed products we have at the moment. We have the Rock n Roll suite featuring the Rockstar bundle and we also have a Kit in the Kits Collection called Rock Legends which works stand alone but when you combine them, well… the ideas are endless!

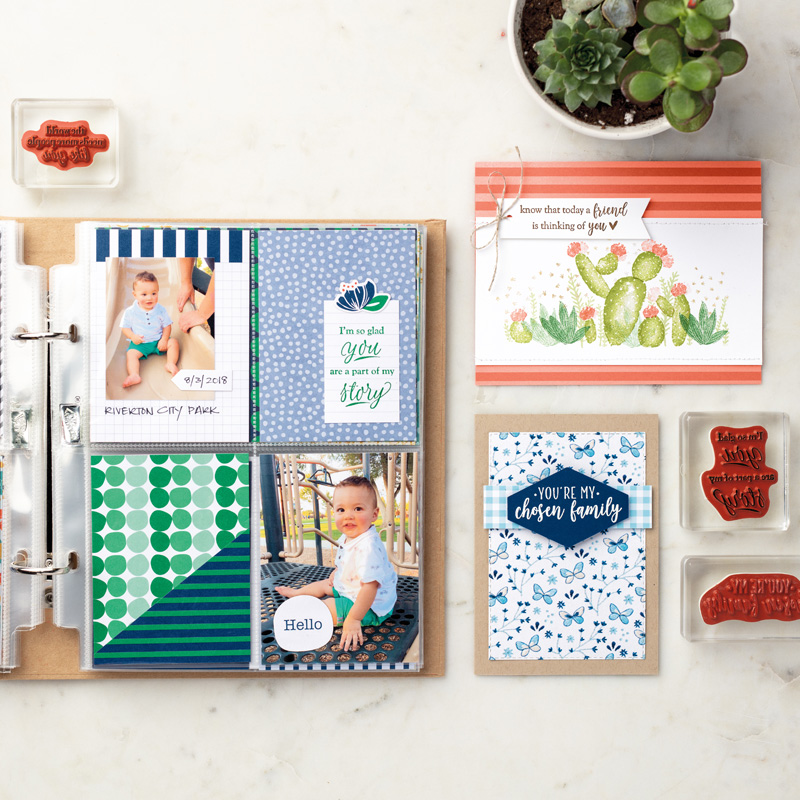
Let’s take a quick look at the kit first… the kit contains two different designs and you make 4 of each design. 

Rose Packer, Stampin' Up!, Creative Roses, Rock n Roll suite, Rockstar bundle, Rock Legend Kit

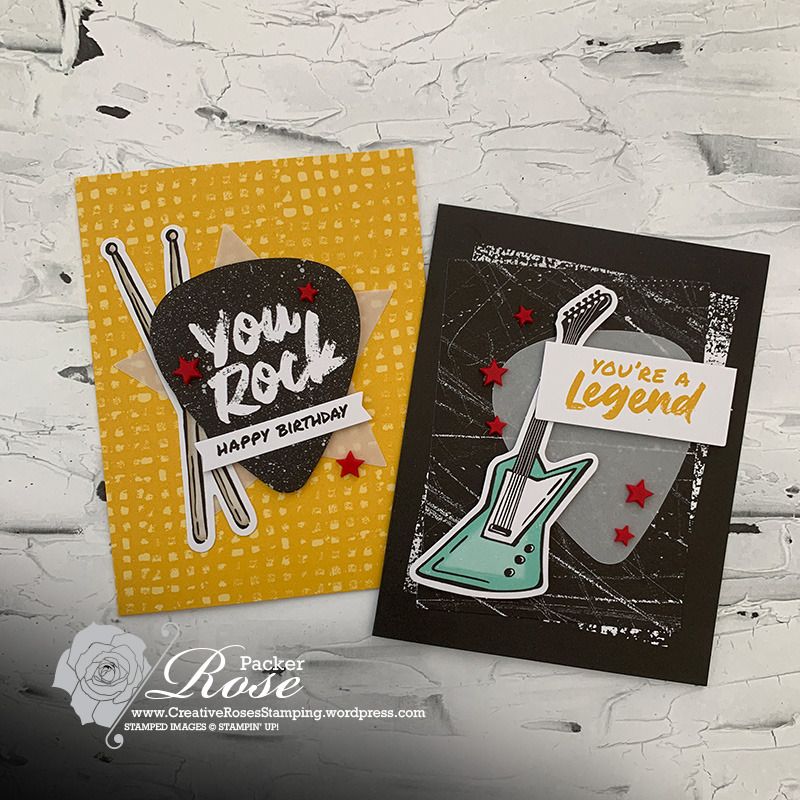
They are quick, easy and great fun to just make up… great if you are looking for a simple but fun crafting experience with some useful cards at the end.

Rose Packer, Stampin' Up!, Creative Roses, Rock n Roll suite, Rockstar bundle, Rock Legend Kit

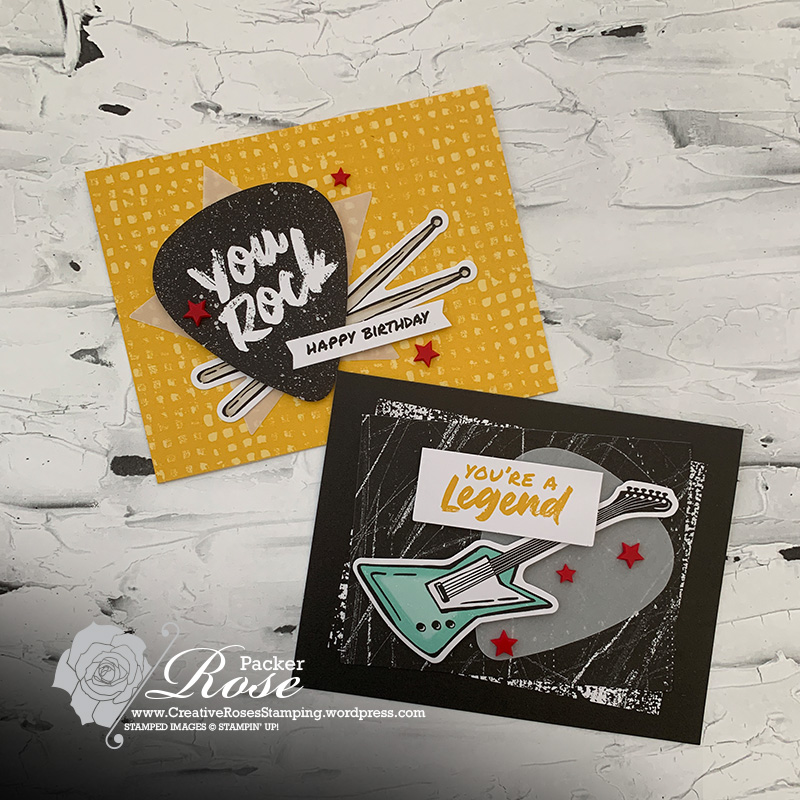
If you are looking for a little challenge, the elements are easy enough to change around to give you a different design. Here I have turned the card bases to landscape and rearranged some of the elements so they fit on, and here I have two more designs. 

You could make up two cards as planned and two cards in this layout and you have 4 different designs.

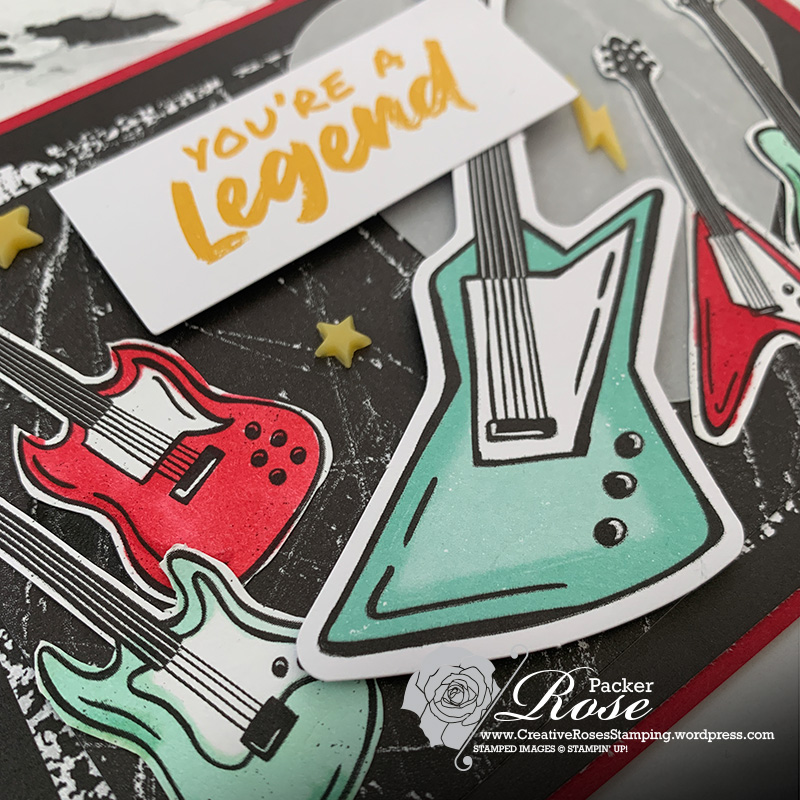
For my crafty crew… you know who you are… crafters who like to mix things up quite a bit. Here I have two more ideas for you. 

Rose Packer, Stampin' Up!, Creative Roses, Rock n Roll suite, Rockstar bundle, Rock Legend Kit

For both of these cards I made up a card base from my own card stock. The card base from the kit, I cut in half and used on the front of the cards.

In this first card, I coloured and fuss cut guitars from the Designer Paper pack. Then arranged them in and around the main Guitar from the kit. Finishing off the card, I scattered some of the Lightening and Star gems.

Rose Packer, Stampin' Up!, Creative Roses, Rock n Roll suite, Rockstar bundle, Rock Legend Kit

The second card, I had fun with the card front from the kit. First, I embossed the card with the Merry Melody embossing folder and then used black ink pad and lightly, gently swiped across the embossed detail to make them stand out a little. Yes, I did get ink on the back of cards in places but that just adds to the grungy feel. 

Rose Packer, Stampin' Up!, Creative Roses, Rock n Roll suite, Rockstar bundle, Rock Legend Kit

After some drying time, I set about making up the card… I stamped and die cut the microphone from the Rockstar bundle and the drums came from Enjoy The Rhythm stamp set. I fussy cut those and placed all the elements together and finished off with some more of the Lightening and Stars adhesive backed gems.

Whilst these sets are not exclusively for men of course, they do make creating for male folk so much more easier, don’t you think?

Until next time… Stamp Creatively,

Click to shop supplies used in this project:

Product List

Stampin’ Staples – Click to shop these commonly used crafting supplies:

Stampin' Seal
$14.00
Paper Trimmer
$46.00
Bone Folder
$12.25
Paper Snips
$19.25
Clear Block B
$12.25
Clear Block D
$16.75
Clear Block E
$23.00
Clear Block H
$16.75

Colour INKspiration

colink-blogbanner-v3

I’m back with some inspiration for the latest Colour INKspiration colour challenge – #ci145. It’s a beauty too. To be honest… we’ve had some pretty awesome ones this year already, the crew have worked hard to find images to inspire our crafting. This one is just as good!

So the colour combination we are working with for this challenge includes Blueberry Bushell, Tahitian Tide and Lemon Lime Twist. Plus of course, we can add the usual neutrals – Basic White, Basic Black, Crumb Cake and metallics.

I went simple and opted to use the Earthen Textures bundle. This suite in the Annual Catalogue is featured using lovely warm earthy neutral tones that look like they have just bounced out of a Decorator Magazine. You know I’m always up for a challenge. So here they are in blues….

Rose Packer, Creative Roses, Stampin' Up!, Earthen Textures, CI145

Layering the blue pots against the white cardstock was a huge contrast with splashes of the Lemon Lime Twist colour for leaves and a thin frame.

Rose Packer, Creative Roses, Stampin' Up!, Earthen Textures, CI145

I also had a small scrap of Basic White cardstock floating around my craft table, so I embossed it with the Cane Weave folder and layered it as a base for the pots to sit on. Finishing off with a couple of Iridescent Pearls as decorations on a pot.

ColINK-badge-v3

More INKspiration is loaded up over in our Facebook Challenge group. Head over and enjoyed all the amazing inspiration from the crew. We will be excited to have you play along with us. This challenge is open until 7pm, Monday, June 26th. Look forward to seeing you over on the group…

Until next time… Stamp Creatively,
RosePacker-SignOff

Click to shop supplies specific to this project:

Stampin’ Staples – Click to shop these commonly used crafting supplies:

Stampin' Seal
$14.00
Paper Trimmer
$46.00
Bone Folder
$12.25
Paper Snips
$19.25
Clear Block B
$12.25
Clear Block D
$16.75
Clear Block E
$23.00
Clear Block H
$16.75

You Can Create It – May pack ideas

Ideas using You Can Create It Kits for the May pack are out today. I had so many ideas of what I wanted to do and make with the kit, I settled on simple and quick… But first let’s take a quick look at what supplies we had to create with.

The main focus was the Fresh as a Daisy paper pack complimented by new In Colour range of cardstock and Jute twine. Plus of course we have the Extra Materials pack to top up with.

Simple and quick… is what I’m about this year, life is just crazy and I’m sure you can relate. But that doesn’t mean we can’t add touches of clever or fun or useful to creating. Here I create two card – same same but different.

Rose Packer, Creative Roses, Stampin' Up!, You Can Create It, Fresh as a Daisy, Brewed for you

Both using Basic White Thick cardstock for bases and layering with the cardstock and Designer paper from the May pack. But I wanted to make my cardstock work hard and go further… so I punched a circle from the cardstock before adhering my layers.

Rose Packer, Creative Roses, Stampin' Up!, You Can Create It, Fresh as a Daisy, Brewed for you

This is a great way to extend your supplies, particularly with specialty’s and foils. 

To make the focal element on the Daisy card, I opted for a quick technique. First heat embossing the flower with White Embossing powder, I then used a Blender pen and White Craft Ink to colour with. Finishing with some of those gorgeous Iridescent pearls to top off a lovely lady card.

Rose Packer, Creative Roses, Stampin' Up!, You Can Create It, Fresh as a Daisy, Brewed for you

So for the second card, I went for a guy theme, using the Brewed For You stamp set. Such a great one for men-folk. Again punch a circle from the Pebbled Path cardstock before layering. I also used the backside of the Designer Paper for this card, for a textured look and a knot in place of the bow. Oh and … I left off the pearls, while some men do like them, I find most don’t!

Rose Packer, Creative Roses, Stampin' Up!, You Can Create It, Fresh as a Daisy, Brewed for you

Here are the ideas from our Global Demonstrators for this months kit:

Alanna Klemick Wharf – IG – @sleeplessstamper

Until next time… Stamp Creatively,

Click to shop supplies used in this project:

Product List
Versamark Pad
$16.75
Heat Tool
$54.00
Blender Pens
$23.00

Stampin’ Staples – Click to shop these commonly used crafting supplies:

Stampin' Seal
$14.00
Paper Trimmer
$46.00
Bone Folder
$12.25
Paper Snips
$19.25
Clear Block B
$12.25
Clear Block D
$16.75
Clear Block E
$23.00
Clear Block H
$16.75

Colour INKspiration – CI139

colink-blogbanner-v3

I have to say Pacific Point was the challenge colour to fit into this combo for me. I love the other colours so much and use them a lot so they were easy.  The colour palette I am referring to is the next challenge from Colour INKspiration. #CI139. Here take a look…

Colours are Melon Mambo, Pool Party, Coastal Cabana and Pacific Point. Plus of course, we can add Basic White and Black and metallics.

Here is the card I made….

Rose Packer, Creative Roses, Stampin' Up!, Conversation bubbles, Artistically inked, Alphabest

Conversation Bubbles bundle is my new current favourite. I just love how you can mix and match the different shapes and sentiments to create exactly that…. A conversation!

I added a frame around the outside, using the stitched rectangle – two layers, one is Basic Black cardstock and the other Designer paper in Pool Party colour. 

Next I set about creating arranging my conversation elements. What I really like about this bundle is that the dies create frames and shapes in the one cut. So you can pick and choose which ones to use. 

Once I had my mapped out where I thought I might like my elements to go, I wanted to add some texture to the background before adhering anything… so using the Hand-drawn dots large background stamp, I inked up part of the stand in one corner and holding it in my hand, I bent it and stamped the dots on the card front inside the frame. What I like about stamping that way is the uneven randomness the pattern creates.

I set about adhering my elements in place – some with liquid glue and some with dimensionals to add texture. Then I created created my sentiment elements – this is where Pacific Point comes to play. White embossing the sentiment onto Pacific cardstock and stamping the 30 in Pacific ink. Yay – tick!

Rose Packer, Creative Roses, Stampin' Up!, Conversation bubbles, Artistically inked, Alphabest

This bundle is fun to create with and gives a modern fun look I think perfect for teenagers. Especially boys – change up the colours and add a phone punch art background and you might just win them over!

ColINK-badge-v3

More INKspiration is loaded up over in our Facebook Challenge group. Head over and enjoyed all the amazing inspiration from the crew. We will be excited to have you play along with us. This challenge is open until Monday March 20th. Look forward to seeing you over on the group..

Until next time… Stamp Creatively,
RosePacker-SignOff

Click to shop supplies specific to this project:

Heat Tool
$53.00
Versamark Pad
$16.75

Stampin’ Staples – Click to shop these commonly used crafting supplies:

Stampin' Seal
$14.00
Paper Trimmer
$46.00
Bone Folder
$12.25
Paper Snips
$19.25
Clear Block B
$12.25
Clear Block D
$16.75
Clear Block E
$23.00
Clear Block H
$16.75

Happy International Scrapbooking Day

Are you a scrapbooker? Do you create albums or the odd page?

Creating a scrapbook album is not something I do. The sheer size of that kind of project overwhelms me. So, instead, I like to create stand-alone pages I can then, frame and hang to display. 

I have several already, but not as many as I would like. So this year, I will be busy catching up on them. The plan is to create a memory wall in my home of all the fun times and significant events that have happened within our family. Although, I’m not sure I would have a wall long enough for that!

Today, I’m sharing my latest page. This one celebrates some recent achievements of my Little Miss. She began gymnastics last year. She nagged me for about a year before that, to swap her dance classes to gymnastics. I did… and she loved it and did so well she was awarded her coach’s medal. She is now into her second year and training with pre-development performance team this year. Beyond proud of her!

Rose Packer, Creative Roses, Stampin' Up!, scrapbooking, International scrapbooking day, Detailed Desert Designer series paper, Alphabet a la Mode die set,

So, to celebrate her achievements I created this page. As you can see, my scrapbooking is about keeping things simple and showcasing the event. I try not to over-embellish and I don’t always journal directly on the page either.

The colours in the photos are always a key starting point for me. Followed by the photo arrangement – which ones am I using? Which ones go together? What sizes do I need?

Next, I set about choosing the Designer Paper and here I started with a sheet from the new pack Delicate Desert, from the January Mini catalogue. Stampin’ Up!’s Designer papers always come in packs – this way colours, pattern themes and designs always match. Perfect if you are completing a whole album – don’t you think? All sheets come as double-sided design – one side is usually a themed design and the back is more of a texture – not always, but usually. Making the pack really flexible for so many applications.

Here I went with one that has a flowy-wavy pattern in orange tones to match the background in the photos. I think it’s my favourite… well this week anyway! To mat the photos, I chose green as the contrast colour to offset this. These two colours sit opposite on the colour wheel, so they always work well.

Rose Packer, Creative Roses, Stampin' Up!, scrapbooking, International scrapbooking day, Detailed Desert Designer series paper, Alphabet a la Mode die set,

Simple die cuts and stamping is all I used to embellish this page. I started in the top left to give your eye a starting point. Then one in the middle to move your eye down and finishing with the title at the bottom which I framed with a large banner in white cardstock.

For the title, I applied Foam Adhesive Sheets to the back of the cardstock before die-cutting. This gave the raised element a 3D look. Here I used the new Alphabet a la Mode die set, also from the January Mini Catalogue. I like the fine lettering, they don’t take over, like chunky ones can.

Rose Packer, Creative Roses, Stampin' Up!, scrapbooking, International scrapbooking day, Detailed Desert Designer series paper, Alphabet a la Mode die set,

I finished off with just a few simple stamps of black stars scattered around.

Here it is finished and framed ready to hang…. C’mon hubby the hanging is your job!

Rose Packer, Creative Roses, Stampin' Up!, scrapbooking, International scrapbooking day, Detailed Desert Designer series paper, Alphabet a la Mode die set,

Until next time… Stamp Creatively,

Click to shop supplies used in this project:

Stampin’ Staples – Click to shop these commonly used crafting supplies:

Stampin' Seal
$14.00
Paper Trimmer
$46.00
Bone Folder
$12.25
Paper Snips
$19.25
Clear Block B
$12.25
Clear Block D
$16.75
Clear Block E
$23.00
Clear Block H
$16.75

You Can Create It

Welcome to another month of ideas using the You Can Create It quarterly kits. We are into the last quarter of the year and have ahead of us three more packs to play with.

This month we had the pleasure of playing with the Gingham Cottage Designer Series paper pack. In it was two different colour sheets. I just love gingham pattern, it’s so playful and cute. Here is just one idea using one of the colours, but of course you can adapt this design to fit with any colour in the pack.

Rose Packer, Creative Roses, Stampin' Up!, Framed Florets, Gingham Cottage, You Can Create It

Here I have used the brand new Framed Floret bundle. There are so many great dies in the set, it was perfect to create with using this pack.

Using products from both the month pack and the Extra Materials pack, I first create base layers of cardstock and the designer paper. Then used extras to create the decorative elements – cardstock to create the layers and Basic White for stamping and colouring.

Rose Packer, Creative Roses, Stampin' Up!, Framed Florets, Gingham Cottage, You Can Create It

To finish, I used a few of the pearls from the extras pack to top off the flowers.

Here are the ideas from our Global Demonstrators for this months kit:

Aude Barbara

Karen Hadler

Fanny Minne

Mikaela Titheridge

Until next time… Stamp Creatively,

Click to shop supplies used in this project:

Stampin’ Staples – Click to shop these commonly used crafting supplies:

Stampin' Seal
$14.00
Paper Trimmer
$46.00
Bone Folder
$12.25
Paper Snips
$19.25
Clear Block B
$12.25
Clear Block D
$16.75
Clear Block E
$23.00
Clear Block H
$16.75

Colour INKspiration – CI130

colink-blogbanner-v3

Got to love a great colour combination challenge. This one, for Colour INKspiration – #CI130, is just that. I loved the colours, appeals to my bold dramatic side. The colours we have this fortnight are:

Parakeet Party, Night of Navy, Highland Heather and Rich Razzleberry.

I pulled out my newly purchased Fond of Autumn bundle… it’s such a beauty. There is lots to get busy with in this set. Here I have used one die to create a textured background, die cutting my Night of Navy cardbase, allowed for a peek-through colour. Behind it, I layered some Parakeet Party designer paper.

Rose Packer, Creative Roses, Stampin' Up!, Fond of Autumn,

Over the top are lots of layers, so easily created with this bundle. I first stamped the large floral image twice, in Rich Razzleberry ink on some Basic White cardstock. I die cut one of the images, with the coordinating frame and just left it as plain white, layering this over the card base.

The second I coloured using Blends in Rich Razzleberry, Parakeet Party and I used a little light Fresh Fresia – as we don’t have Highland Heather in the Blends range. After colouring, I used another die in the sit to die cut my images – this one cuts the large floral into four separate pieces. Allowing for a different layering of the imagery.

Rose Packer, Creative Roses, Stampin' Up!, Fond of Autumn,

Here I have pieces my floral arrangement together, using liquid glue and dimensionals so allow for depth. I die cut a banner from Parakeet Party cardstock and layered this beneath some layers and over others. A simple sentiment stamped and trimmed adhered over the banner, finished off the main elements. Then I just topped off with some of the pinky-purple sequins.

ColINK-badge-v3

More INKspiration is loaded up over in our Facebook Challenge group. Head over and enjoyed all the amazing inspiration from the crew. We will be excited to have you play along with us. All the details are in the post with this colour challenge image. This challenge is open until Monday, October 10th. Look forward to seeing you over on the group…

Until next time… Stamp Creatively,
RosePacker-SignOff

Click to shop supplies specific to this project:

Stampin’ Staples – Click to shop these commonly used crafting supplies:

Stampin' Seal
$14.00
Paper Trimmer
$46.00
Bone Folder
$12.25
Paper Snips
$19.25
Clear Block B
$12.25
Clear Block D
$16.75
Clear Block E
$23.00
Clear Block H
$16.75

Ornate Garden Suite – Early Release

ORNATE_GARDEN-Banner2_600px

Country Garden meets Vintage style… get your first look at the 2020 Annual Catalogue with this early release suite. If this is anything to go by… the 2020 Annual Catalogue, coming this June, is going to be awesome.

This suite available from today, through May leading into the new catalogue… and it’s just gorgeous.

As the name suggests, the suite has a lovely country garden feel with the feeling of an abundance of flowers in their design.

Here is a sample of what I’ve been playing with:

Rose Packer, Creative Roses, Stampin' Up!, Ornate Garden suite, Ornate Style bundle, Ornate Style stamp set, Ornate Layers dies

The suite features two bundles, Specialty Designer paper, Embossing folder, Ribbon combo pack and Gilded Gems (I’m such a sucker for gems…. I’ve bought three packs already!).

The suite is available a couple of ways:

  • Purchase the whole collection in one hit;
  • Purchase the bundles individually (saving 10%); or
  • Purchase your favourite items individually.

Once you have purchased your products and they have arrived… come back and get inky with me. Let me help get your creative juices flowing and make this card with me: the dimensions are at the bottom of this post, and the steps in my latest YouTube video….

See the Ornate Garden suite of products here at my Stampin’ Up! online store:

RosePacker-ShopTODAY

You can shop while there – don’t forget to use this months host code (Click the home button above and the code is on the right). Or contact me and I’ll help you directly.

Until next time… Stamp Creatively,
RosePacker-SignOff

Ornate Garden Card products & dimensions:

  • Cardbase: Very Vanilla Thick cardstock. Cut an A4 sheet in half to 148.5mm x 210mm, score in half at 105mm
  • So Saffron cardstock layer: Cut to 70mm x 148mm. Cut one of the longer edges on an angle to your liking. Emboss with the Ornate Flowers 3D embossing folder
  • Speciality Designer Series Paper: Cut a strip to 148mm x 50mm
  • Gold Frame is die cut from Gold foil
  • Stamping is completed on Very Vanilla cardstock

Other products used Ornate Garden Card are:

CTC211 – All My Love

CTC-BlogBanner

Welcome to Caseing The Catty blog hop this week where we take our first look, draw our first inspiration, from the first suite in the Occasions catalogue – the All My Love Suite, pages 4 to 9.

ctc211

You may have hopped over from Michelle or starting the hop here with me, either way welcome and I’m sure you’ll enjoy the hop. Don’t forget to load up your projects, with this theme, to our Facebook challenge group to inspire us all.

So, this week, I kind of went with a different line of inspiration…. In looking at the ideas and at the products in these pages, another idea hit me altogether. Focussing on the Forever Lovely bundle, I wanted to use those gorgeous roses edgelits from the Lovely Flowers Edgelit die set to make a window. Here is the finished card….

Rose Packer, Creative Roses, Stampin' Up!, Forever Lovely bundle, Forever Lovely stamp set, Lovely Flowers edgelit dies

I cut two of the edgelits around the card front and then used my paper snips to trim the middle excess cardstock out to create the window… here is what the card front looked like before I did anything else with it.

Rose Packer, Creative Roses, Stampin' Up!, Forever Lovely bundle, Forever Lovely stamp set, Lovely Flowers edgelit dies

I just had to use some of that gorgeous awesome Lovely Lipstick foil sheets, in the window. So I cut a card front size piece and used Tear and Tape to stick it in.

Then I set about decorating the front and covering the snipped sections between the two die cuts. I stamped a lovely rose in Grapefruit Grove. The stamp set is a DistINKtive type, so it has that lovely varying tone when stamped. I added some foliage in Soft Seafoam and Granny Apple Green cardstock.

Rose Packer, Creative Roses, Stampin' Up!, Forever Lovely bundle, Forever Lovely stamp set, Lovely Flowers edgelit dies

I wanted to try something a little different with the other end… there is a corner piece thinlit die in the set which you can use to decorate a corner of an element. Here I used it to help cover the snipped section which tied in well with the designed.

I then added the sentiment – punched a label from the Petals and More thinlit dies, stamped a punched Birthday Wishes and layered over the top. Then I added some die cut flowers from the die set and topped it all off with some Artisan Pearls.

Next up in the hop is the clever Monique Fielder.

CTC-Next

After you’ve enjoyed the awesome hop with the team, I’m looking forward to seeing your CASE over in our challenge group. Be sure to load up your creation by 6pm next Sunday night, January 20th.

CTC-BlogBanner2

Until next time… Stamp Creatively,
RosePacker-SignOff

Click to shop these supplies:

CTC210 – Sale-a-bration

CTC-BlogBanner

It’s Sale-a-Bration time!

I love this time of year and this week at Caseing The Catty we are drawing inspiration from the Sale-a-Bration Catalogue. Welcome if you have joined me here or if you have hopped over from one of our new Crew members, Lauren!

ctc210

Sale-a-bration is a promotion that Stampin’ Up! run once a year and it’s when customers earn free products based on their spending or when they host a party or join the team – more information is here.

Today, I’m drawing inspiration from this Blue card… it’s on Page 14 of the SAB catalogue, and using the featured stamp set, Part of my Story.

I just loved this stamp and thought it was perfect to kick off Caseing The Catty with this year. So many people inspire us each day and don’t know that their actions have such an impact, like…. Stampin’ Up!’s concept designers who bring us the amazing samples in our catalogue several times a year; or like my sister-in-law who is changing her families eating habbits upside down to include less sugar, packaged and processed foods and eating whole foods for a healthier lifestyle; or like my best friend and the way she is raising her three gorgeous girls in to the amazing young ladies they becoming. They are all going about their day doing their thing which I find so inspiring.

I started by almost recreating the card as I see it.

Rose Packer, Creative Roses, Stampin' Up!, Part of my story, SAB, Sale-a-bration, Gingham Gala suite

Crumb Cake base card, with two layers of designer paper and the punched sentiment over the top. I did add a layer of cardstock to the base of the designer paper. This card design would be great for those times where we are short on time and need to whip up something.

Thanks to our extremely hot weather late last week, I had a little more time and stayed indoors a lot more! So, I had a little extra crafting time and I added a couple of extra layers.

rosepacker19-02b

Again starting with the Crumb Cake cardbase, I added a layer of Daffodil Delight cardstock beneath the Gingham Gala designer series paper. I love the double-sided checked pattern in this pack and today, opted for the larger check. Layering these together flat, I used dimensionals to fix to the base card.

I used some In Colour designer paper in Blueberry Bushel to contrast. Deciding to frame the sentiment, I settled on one from the Foliage Frame die set in Crumb Cake cardstock to match the base. I had a spare circle shape floating about, so I thought I’d put that to use. I first punched a 2” circle from the circle shape, leaving a frame, which I tucked behind the Foliage die. Then I layered the punched circle inside and overlayed the sentiment. This I stamped in Blueberry Bushel ink on some Daffodil Delight cardstock and punched using the Tailored Tag punch.

Rose Packer, Creative Roses, Stampin' Up!, Part of my story, SAB, Sale-a-bration, Gingham Gala suite

A card design for when you have a few extra minutes and some extra supplies.

Next up in the hop is the ever amazing Elizabeth Gross.

CTC-Next

After you’ve enjoyed the awesome hop with the team, I’m looking forward to seeing your CASE over in our challenge group. Be sure to load up your creation by 7pm next Sunday night, January 13th.

CTC-BlogBanner2

Until next time… Stamp Creatively,
RosePacker-SignOff

Click to shop these supplies: